Showing posts with label Tutorial. Show all posts

Thursday, July 14, 2011

Oodles of Doodles

                I have often wished I was an amazing doodler (like Alisa Burk, you should see her super cute doodled/crazy stitched/painted pillow).  An then I practiced. It's true, practice makes perfect. I started by copying some of her designs, and them learned to do it with my own style.  You are welcome to copy mine.  I started with a piece of paper with my friends name in the middle.  Then I doodled (with sharpie) in spare time during school and here is the result:


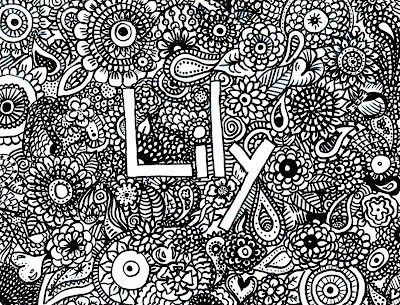
 But I would suggest that you use a small name of 4 letters or less. Actually, you don't have to draw a name on it at all.  Here is why:  If you scan the picture to the computer, and then go to Picnik, you can work wonders. I like picnik because a lot of it is free.You want to end up being able to use it for any name. All that doodling would be wasted if it only used one name.  You want to go from the Lily (above) to this:


After you scan your doodle to the computer follow these instructions:
  1. Go to picnik.com
  2. Press "Upload a Photo"
  3. Upload the doodles photo
  4. You can change the exposure, and crop it and all that jazz (optional)
  5. Now hit the "Create" button or the Done button (it depends if you are a member or not)
  6. Click "Stickers"
  7. Scroll down the sidebar on the left till you see Basic Shapes
  8. Click on any of the basic stickers
  9. Enlarge it to completely cover the name
  10. Change the color to white
  11. SAVE SAVE SAVE it
I know it might look like there's a lot of steps involved, but its really easy, especially if you have used picnic before.  Now your Doodle should look like this:

Or this:

Or this:
 Or this:

 Or this

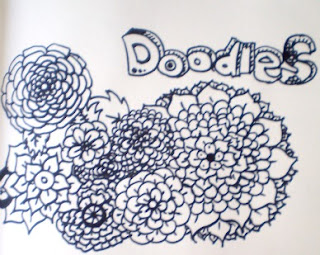
You ca use whatever you shape want as long as it covers up the name.  See,  now we add a name to it.  Here is more steps. 
  1. Click on text
  2. In the bar that says Type here and click add to place text, type a name. 
  3. Change the color to black
  4. Give it a pretty font
  5. Save it
  6. Print it
  7. Put in it something (kids love putting them in their school binders)
Now you have a pretty name, that can be used for a baby shower gift, personalized wrapping paper, the possibilities are endless, plus everyone is amazed by it and asks you if it is printed or hand drawn.

Monday, June 20, 2011

Amazing Hot Glue Glitter Dots


Can you believe these all these are made of is glue and glitter! They are super easy and super cute and great for sticking all over hair flowers, headbands, scrapbook pages, birthday cards, binders, tissue boxes, mirrors, ooh a glass vase would be cool with them stuck all over...  These are actually a knockoff from some that I got at Hobby Lobby:

 Here's how you can make your own.

Now its time to decorate tiara's or some other cute thing!
Maddie

Wednesday, June 15, 2011

T-Shirt Bracelet

I actually got this Idea from V and Co., but she makes hers a little different and I like this way better.

      
Nope, they are not braided, these cute bracelets are finger knitted.  And all you need to made them is an old t-shirt.  Even little kid shirts will work, they will just make less bracelets. 
Tip: If you have a cute shirt but there is something on the front, cut around it or use just the back.
Materials:

  • old t-shirt
  • rotary cutter (or scissors)
  • rotary mat
  • hot glue gun
  • fingers

Keep repeating steps 7 and 8 until it is wrist sized.  You might want to make it smaller than usual because they stretch.
Triple knot it, and trim the ends off.  Put hot glue or another glue around the knot.

This is why I glue the ropes together, not tie them.


Monday, June 13, 2011

Bird Nest Tutorial


This is kind of a spring craft, but this is a summer blog, and I made the actual nest in spring, so here goes.  I see those grapevine balls cut into nests and store bought nests everywhere, but considering I have no money, I made my own.  You could probably go a lot farther with this and make it into a fruit bowl or a ball.

You will need:
  • twigs, reeds, or bird-nesty stuff
  • hot glue gun
  • wire (optional)
  • white spraypaint
 
        First, go on a walk and gather bird nest materials.  Its okay if they are different colors as long as you are planning on spray painting it. If you are not spray painting, then make sure they are the same color. You will need more twigs than it shows in the photo.

          Bend the sticks and dried grasses and glue them together as best you can.  This will be the rim of your nest so make it the size you want the nest to be.  Put 3 eggs inside to make sure it is big enough to fit them all.  You can use wire to hold it together if you need to. I used it, but it shows a tiny bit when you paint it.

Now make a slightly smaller one. Then make a even smaller one to form the base.  Glue the two smaller ones together and then the large one. If you want it to be taller (mine turned out pretty short) then you can add another layer to the top. Now spray paint it, let it dry, flip it over, and paint the back.  I only did one coat because I liked how some of the brown showed through in spots.